
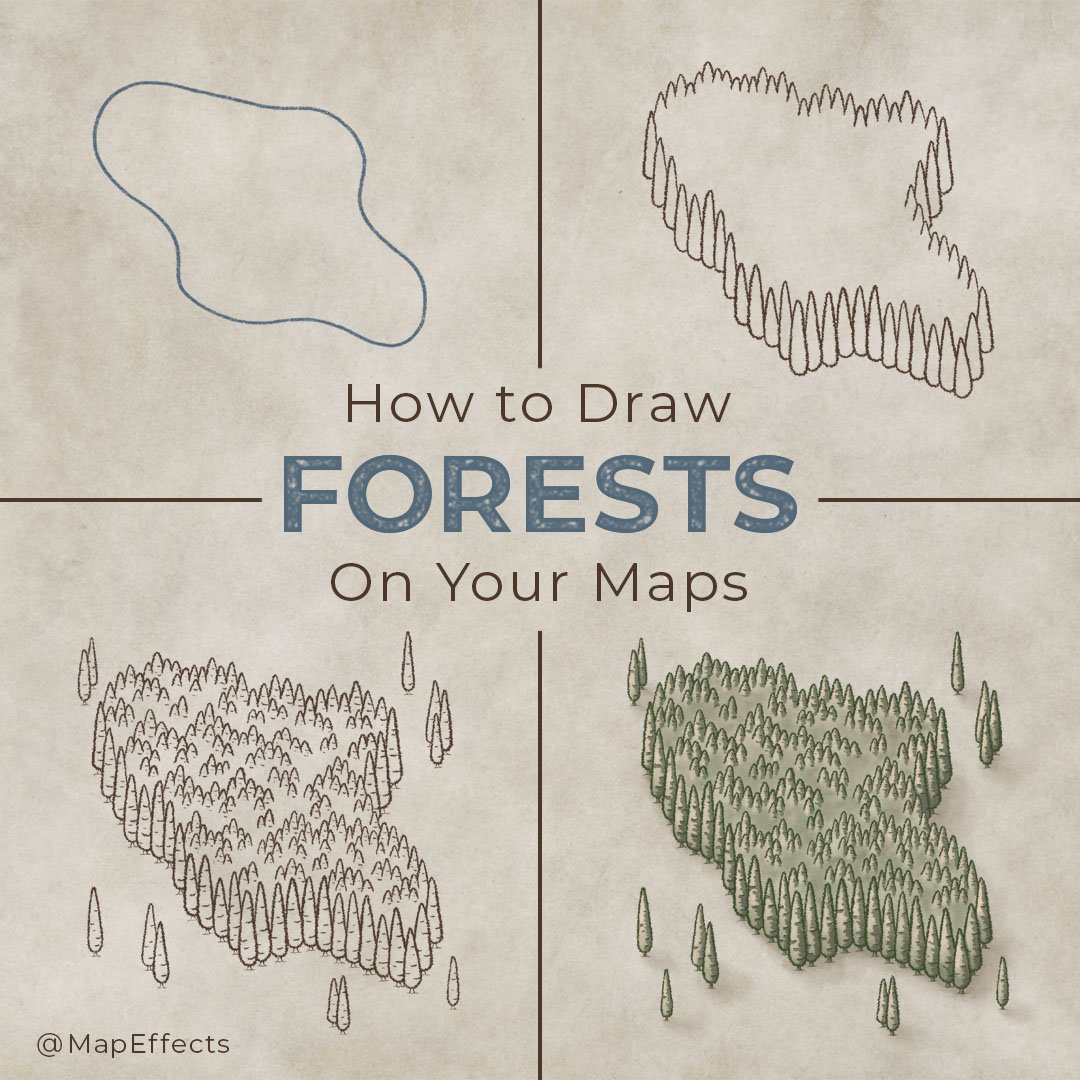
How to Draw Forests
From the gloom of Mirkwood to the comfort of the Hundred Acre Wood, forests are one of the most iconic settings in storytelling. There is just something about a forest that brings a feeling of mystery, not knowing what lies around the bend in the trail. Whether you are creating a setting for your next rpg campaign or writing a story for your book, an enchanted glade in the middle of a dense canopy, or a lost city reclaimed by the trees is where myths are born and retold.
The methods and styles for drawing a forest on your fantasy map are seemingly endless, ranging from the simple to the complex. In this tutorial, I will walk you through some easy steps that anyone can use to create an iconic forest, even if you don’t have much confidence in your drawing abilities. It all comes down to some simple shapes and I’ll share some tips to keep in mind so you can map your story!
All of the brushes I will be using for this tutorial are available in the Map Maker Essential Brushes pack for Procreate & Photoshop.

Sketch the Shape
Begin by drawing a rough shape for your forest with a pencil or on its own layer if you’re working digitally. You may be tempted to skip this step, but don’t, because it gives you a guide to follow when you start drawing individual trees. If you jump into drawing trees too soon you’ll often find yourself having to erase and redo sections when the forest’s shape begins looking unnatural. I know this from experience!

Add the Front Row of Trees
Now that you know where you want your forest, you can begin drawing the trees in the front row. I find it best to start at the bottom and work your way up. This allows you to draw them “behind” the other trees so they overlap to create a sense of depth.

Using Custom Brushes
You can always use a standard hard round brush to draw the trees. But in this example I have taken the brush I am using and modified it to give it a bit more character. In this case, I had turned up the “jitter” and added a texture to the brush’s background to make it feel organic and random.
You can get the Weathered Liner Brush I’m using HERE in the Map Effects Shop
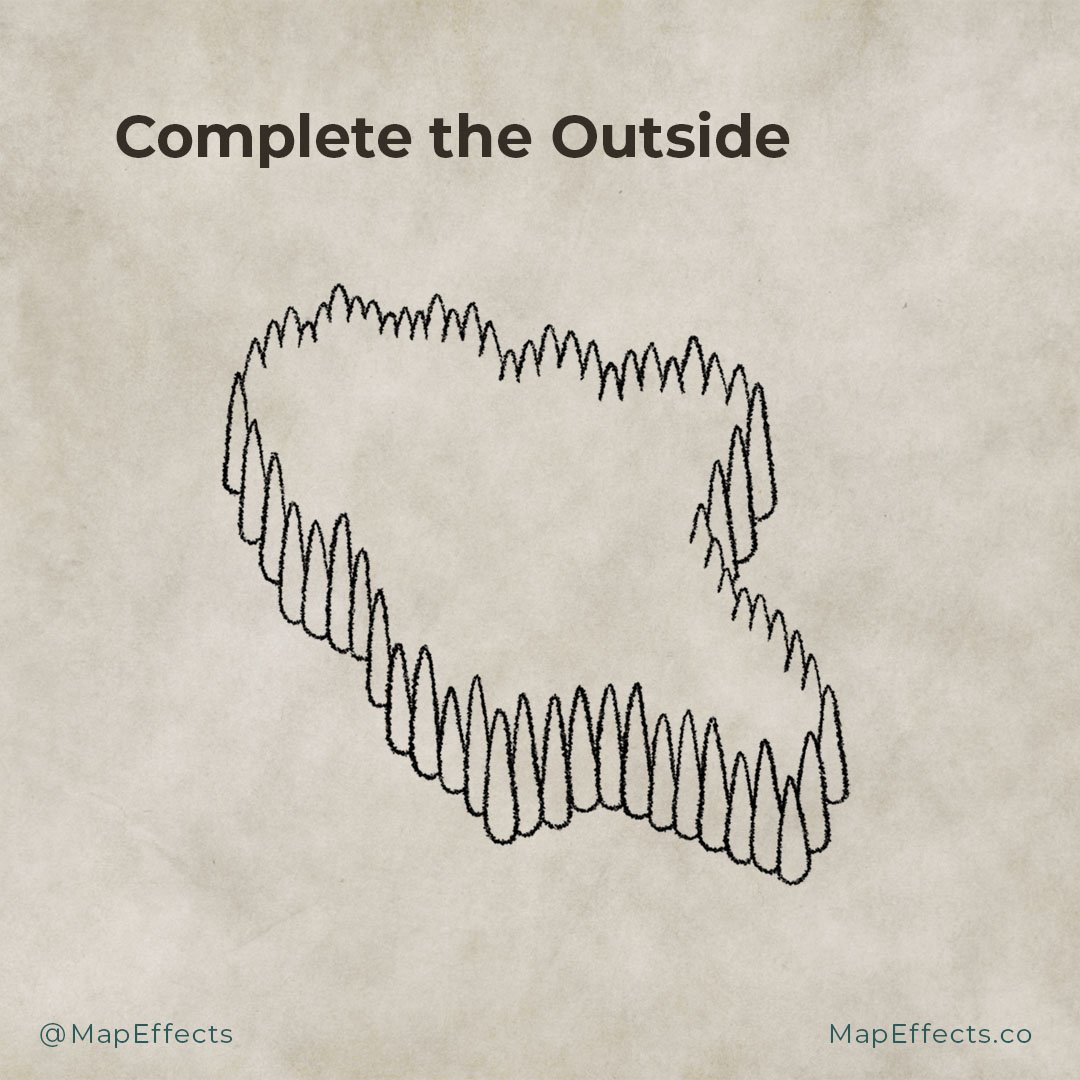
Complete the Outside
With the front row of trees in place, you can begin working your way around the rest of the forest. Along the edges, you can add layers of trees, which overlap more than the ones you did in the front. Then, once you come to the back you will only be drawing the tops of the trees as simple triangular shapes.

Add Main Tree Tops
You can not start to add some tree tops to the center of the forest to give it some more detail. Rather than just doing a scattering of trees though, I like to draw this first pass more as connected arches of trees which will give it some more cohesive form. This forest is on a relatively level landscape, so you don’t want to go too crazy with it, but if you want to learn how to draw a forest on a hill or climbing up the side of a mountain, then check my Map Tip on How to Draw Forest on Hills.

Fill in with Tree Tops
With your main rows of trees in place, you can begin filling in the rest of the forest. There is no right or wrong number of tree tops to include here, so just experiment and see what looks right for you. In general, the smaller in scale your forest will appear on your map the less detail you want to use so it doesn’t end up looking messy. But, if the scale is closer to a regional map then you can afford to add some more trees for texture.

Draw in Tree Trunks
As I said in the previous step, the amount of detail you include for your forest is dependent on the scale it will appear on your map. In this case, the forest is fairly large, which allows you to use a little more detail. So I will draw some simple trunks on each of the trees in the front row, and some horizontal lines radiating out from the trunks to give a little texture to the ground.
What if You’re Using a Smaller Scale?
If you are wanting to draw smaller trees but still want to give a little more depth to the forest, then you can either do a small verticle line to give the impression of a trunk. Or, you can draw a short horizontal line to the left or right (depending on your light direction) to make it look like a subtle cast shadow on the ground.
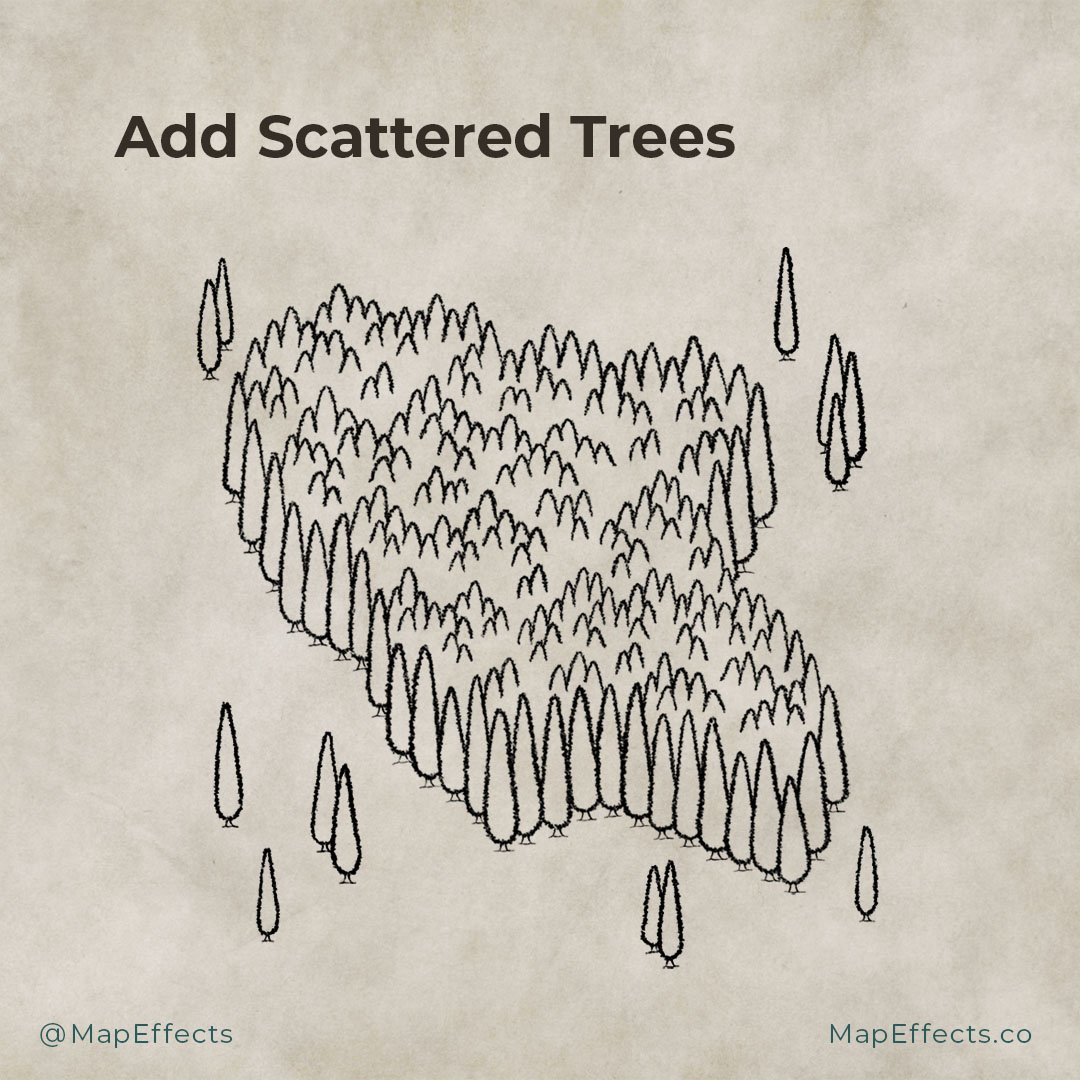
Add Scattered Trees
The last thing you can do is add a few extra trees scattered around the perimeter. If you look at real forests you’ll notice that they don’t naturally have hard edges. Instead, the trees gradually get more sparse until the forests transitions into grassland or some other terrain. The main thing to remember is to try to mix up the number of trees in a grouping so you don’t end up with too much of a pattern.
More Tutorials You May Enjoy


Block in the Main Color
With all the line art done, you can now begin coloring in the forest. If you are working digitally, create a new layer below your line work, and use the eyedropper tool to select the aged paper background. You can then shift the hue toward the greens until you find a color you’re happy with. Then lower the brightness until you get something that harmonizes with the background.
Coloring the Line Art
The other thing you can do if you’re working digitally is recoloring the line art itself. Assuming all your line art is on its own layer, all you have to do is turn “Alpha Lock” on for that layer and paint whatever color you want over it. This allows you to only apply color to the pixels on your line art layer.
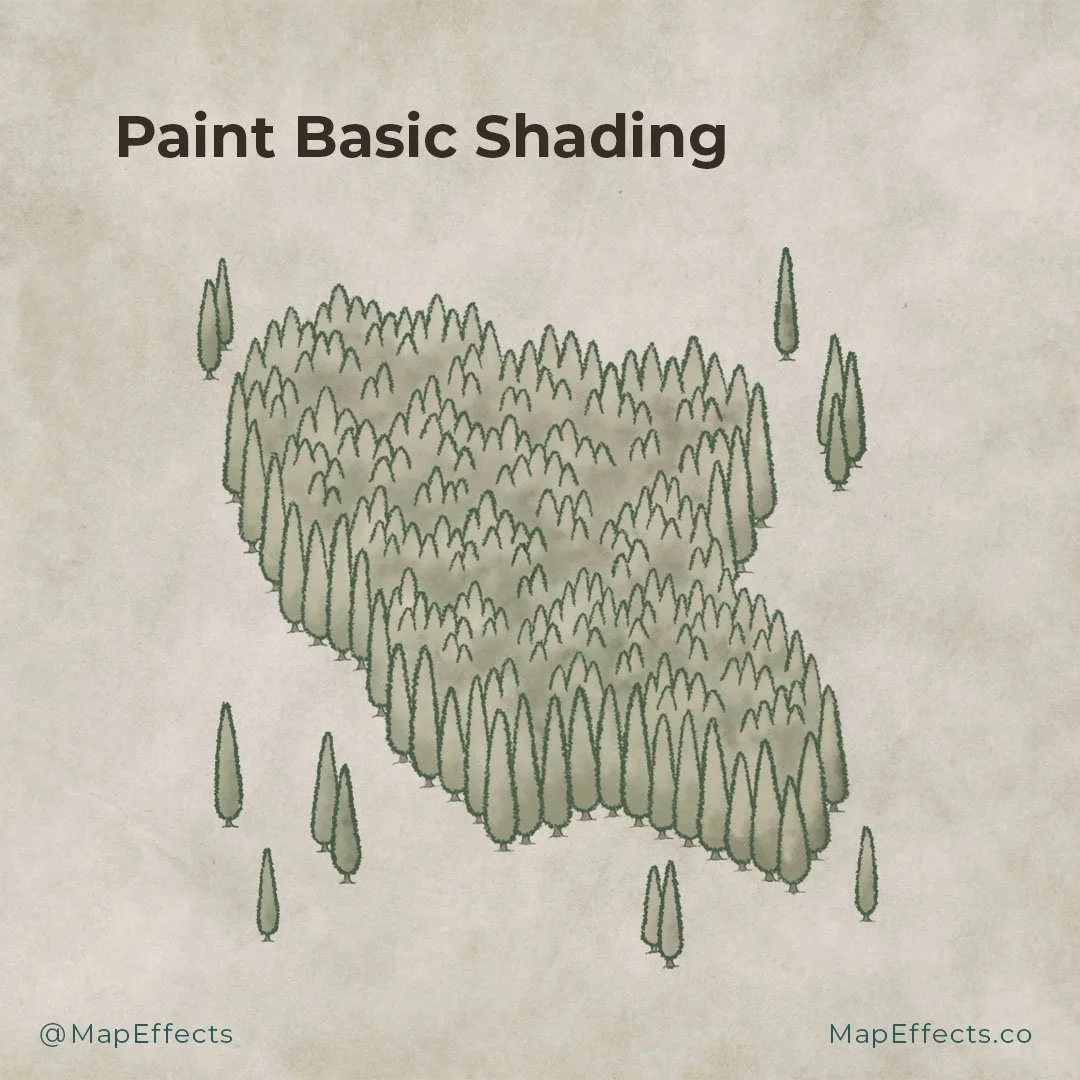
Paint Basic Shading
Once you have your base color in place you can add some simple shadows and highlights. Rather than shading individual trees at this point, try to add broad shading as if the forest is one object.
The Shadows
In this case, the light source is coming from the upper-left of the canvas. You can then take a darker version of your base color and begin painting in some broad shadows to the bottom edge of the main forest. You can also add a little bit of shadow for texture in the middle of the forest between the tree tops.
The Highlights
With the shadows in place, you can add some highlights to the tops of the trees. Keep things pretty simple and loose as this is primarily giving some form and texture to the forest.
For this stage, I am using the Old Sponge Filler Brush because it has a little softer, random edge, but still retains a bit of texture.

Add Deeper Shadows
Now that you have some general shadows and highlights painted on your forest, you can now deepen the shadows on individual trees to give more contrast and texture.
For these shadows, you can use the same textured brush that was used for the line art. This will give you a lot of control over the shadows while still having the organic character of the brush. Then it is just a matter of hitting every tree and tree top with a bit of shadow on the side that is hidden from the light source. You can use a bit of a rougher edge as well to give the impression of branches on the trees.
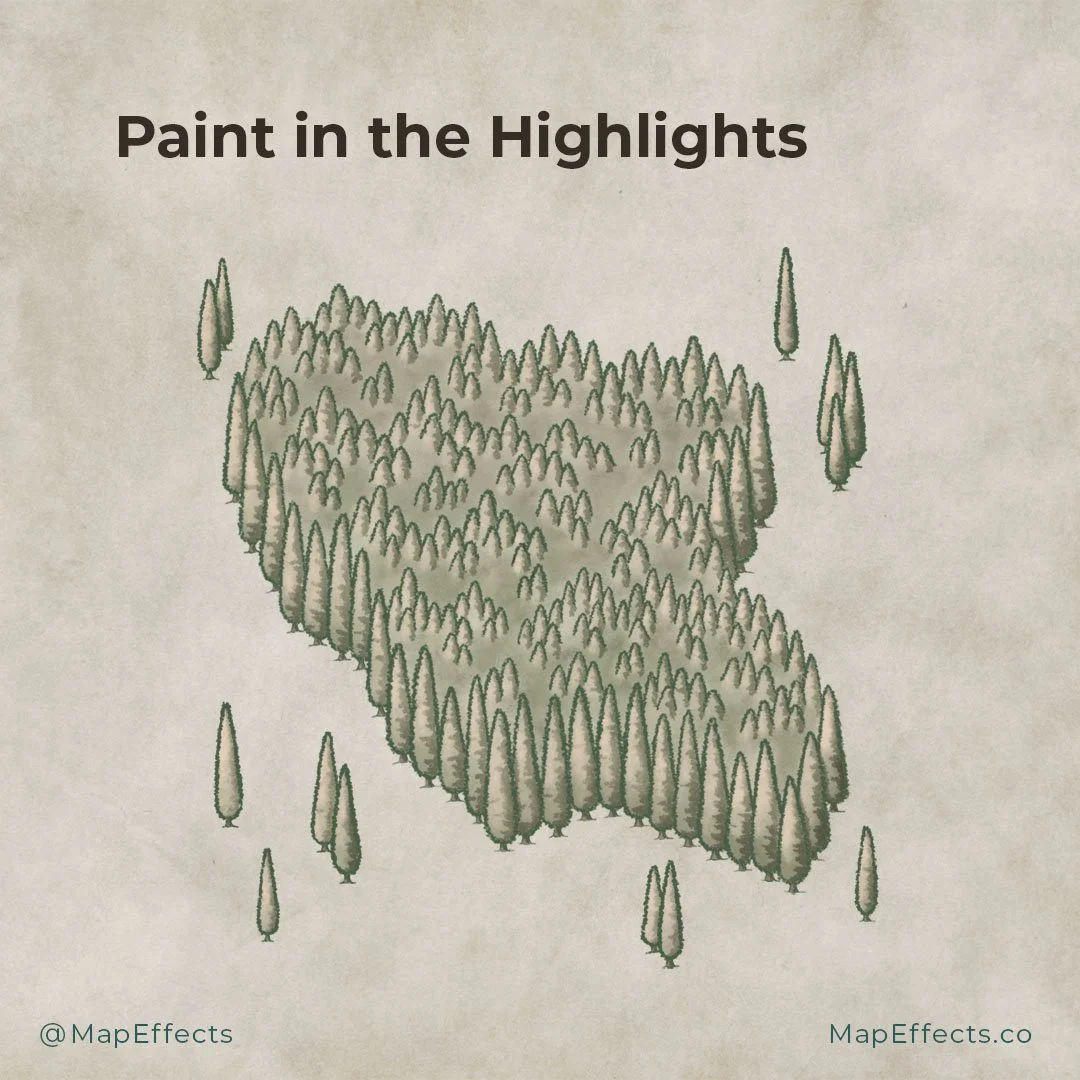
Paint in the Highlights
Start with your base color of the forest again, but this time bring up the brightness and lower the saturation slightly, then shift the hue a little toward yellow. This will give the impression the highlights are receiving the warm hues from the sunlight. Then use the same technique you did in the previous step but apply it to the opposite side of the trees. You will be surprised how much a few highlights can add to your illustration!

Paint in a Cast Shadow
You’re almost done! But the last thing to do is paint some shadows on the terrain itself so it feels like the forest is a part of it and not just sitting on top of your map. Just take a darker shade of the paper background color and paint it on a layer below your forest color. Again, just make sure to be aware of the light direction so that your shadows stay consistent.
Drawing so many individual trees can certainly be time-consuming, especially if the forest is large. But, even though you may lose the feeling in your hand by the end, I think you’ll find the results are worth it.
If you found this tutorial helpful be sure to follow MapEffects on Instagram and tag me with the map you create and I may feature your work! Thank you, and I look forward to seeing you map your story!
Josh
